As the price of cloud computing continues to tumble we can do what was previously unthinkable. It wasn’t long ago that getting WordPress to scale to 10 million hits a day for $15 a month was front page hacker news material; but we can do even better.
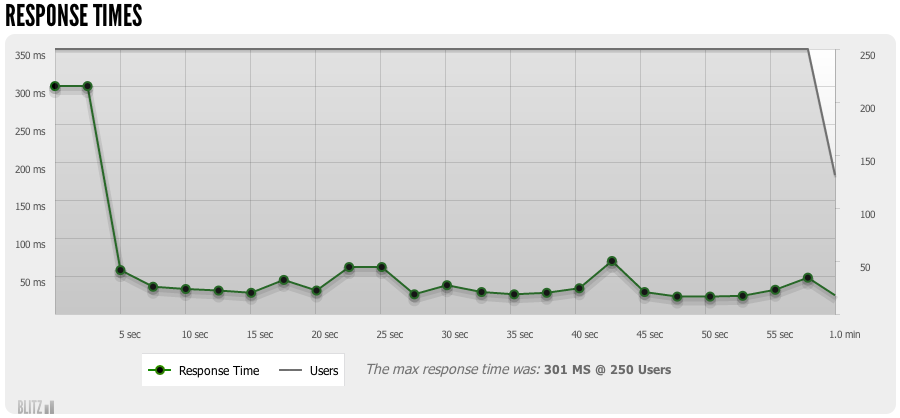
Using the steps described below a blitz.io rush with 250 concurrent users on this site produced the following result.

Test was run and generated 14,258 successful hits in 1.0 min and we
transferred 439.73 MB of data in and out of your app. The average hit rate
of 229/second translates to about 19,832,748 hits/day.The average response time was 46 ms.
Ok, so it’s only 20 million a day after rounding up but that’s still not bad and here’s how anyone can get this for free.
Step 1: Hosting WordPress
In order to scale WordPress up to handle millions of hits a day with limited resources we need to take advantage of extensive caching. This means not only locally caching objects and pages when it makes sense but also to properly set caching headers so that remote clients and reverse proxies will help us cache our content as designed.
I’ve blogged about how to cache and set the proper headers for our dynamic HTML pages before but the general gist is we want to add in a Memcache layer and to do full-page caching with Batcache which also gives us proper HTTP caching headers for free. (Well there are a couple minor issues with the HTTP headers that Batcache sends by default but I’ve patched them and issued a pull request.)
I’ve already created a WordPress on Heroku repo on GitHub that anyone can deploy to Heroku as is with Memcached and Batcache preconfigured. Simply sign up for a free Heroku account, install the Heroku toolbelt, and run the bash script below to get up and running.
#!/bin/bash

# Clone my WordPress Heroku repo and cd into it
git clone git://github.com/xyu/wordpress-heroku.git
cd wordpress-heroku

# Create heroku app, add required add-ons, and set configs
heroku create
heroku addons:add cleardb:ignite
heroku addons:add memcachier:dev
heroku config:set
  WP_AUTH_KEY=`dd if=/dev/random bs=1 count=96 2>/dev/null | base64`
  WP_SECURE_AUTH_KEY=`dd if=/dev/random bs=1 count=96 2>/dev/null | base64`
  WP_LOGGED_IN_KEY=`dd if=/dev/random bs=1 count=96 2>/dev/null | base64`
  WP_NONCE_KEY=`dd if=/dev/random bs=1 count=96 2>/dev/null | base64`
  WP_AUTH_SALT=`dd if=/dev/random bs=1 count=96 2>/dev/null | base64`
  WP_SECURE_AUTH_SALT=`dd if=/dev/random bs=1 count=96 2>/dev/null | base64`
  WP_LOGGED_IN_SALT=`dd if=/dev/random bs=1 count=96 2>/dev/null | base64`
  WP_NONCE_SALT=`dd if=/dev/random bs=1 count=96 2>/dev/null | base64`

# Create branch and deploy
git checkout -b production
git push heroku production:master
At this point with just basic page caching in place our single dyno with 512MB of memory held up reasonably well to the onslaught of 250 concurrent users from blitz.io staying up and serving requests until the last 7 seconds of the test run and getting a score of almost 4 million hits per day. (Full report.)

This rush generated 2,829 successful hits in 1.0 min and we
transferred 89.47 MB of data in and out of your app. The average hit
rate of 44/second translates to about 3,828,172 hits/day.The average response time of 2.61 seconds is considerably higher than most
other sites that are built to scale out. Response times less than 250 ms are
what the cool kids strive for.
But with a load time that’s 50x worse than our goal and falling over in less than a minute, it just won’t do. We need to bring out the big guns.
Step 2: CloudFlare Edge Caching
To get load off our 1 tiny dyno instance we need to push as much load as we can off into CDNs / edge caches which is where CloudFlare comes in.
By default CloudFlare will only cache our page assets but not the generated HTML. Unfortunately it takes much more resources for us to serve dynamic WordPress HTML pages than it does serving static assets. Even with Batcache and a Memcached backend we still have to spin up a php process for each page request. Luckily CloudFlare allows us to customize this behavior with page rules.
With page rules we can configure CloudFlare to match a URL pattern and apply a different set of caching options to those paths. In addition to the normal “basic”, “simplified”, or “aggressive” caching pattern two new options are available to us when using page rules; “bypass cache” and “cache everything”. The latter of which when enabled is the only way to make CloudFlare respect the cache headers sent by our application for HTML pages. When set CloudFlare will also give us two configurable TTL options, “Edge cache expire TTL” & “Browser cache expire TTL”.
Edge cache expire TTL specifies how long CloudFlare’s edge servers will hold our content in its cache. On a free account we can set this to have CloudFlare respect existing cache headers or to a static value from 2 hours up to 2 days. Because we are sending proper caching headers that have differing max-age values depending on content we can just have CloudFlare match all paths and set this to respect our existing headers.
Browser cache expire TTL functions a bit differently, this setting governs what max-age value CloudFlare will send back with the HTTP response to the client. Yes, CloudFlare will in fact rewrite our carefully crafted max-age and Expires headers with their own. With a free account we must select from a set of predefined increments ranging from 30 minutes to 1 year. (Paid enterprise accounts can select a value as low as 30 seconds.) The one trick with this setting is that CloudFlare interprets the value set as the minimum TTL. So setting this to 30 minutes will still allow us to send an expires of 1 year for static assets and have that value passed back to the end-user. For a free account this is not a bad tradeoff as it simply means new updates on our pages may take up to 30 minutes to propagate to visitors that already have a copy of the page cached but new visitors get fresh copies as governed by the caching settings we control.
With edge cache expire TTL set to “respect all existing headers” and browser cache expire TTL set to “30 minutes” CloudFlare will no longer contact our origin server for HTML pages on every request. Instead CloudFlare will start serving most of our HTTP requests on its own, only checking back with our origin server for new content when the resource has expired. This allows us to update our HTML content pages more frequently while still serving static page assets with a long one year expiration.
GET /assets/v20130717.1/css/main.css HTTP/1.1
Accept: */*
Accept-Encoding: gzip, deflate, compress
Host: www.xyu.io
User-Agent: HTTPie/0.6.0

HTTP/1.1 200 OK
CF-Cache-Status: HIT
CF-RAY: XXXXX
Cache-Control: public, max-age=31536000
Connection: keep-alive
Content-Encoding: gzip
Content-Type: text/css
Date: Sun, 21 Jul 2013 15:50:28 GMT
Expires: Mon, 21 Jul 2014 15:50:28 GMT
Last-Modified: Wed, 17 Jul 2013 22:32:27 GMT
Server: cloudflare-nginx
Set-Cookie: __cfduid=XXXXX; expires=Mon, 23-Dec-2019 23:50:00 GMT; path=/; domain=.xyu.io
Transfer-Encoding: chunked
Vary: Accept-Encoding
And HTML pages are now served from CloudFlare as well, albeit with a longer max-age than I would have liked.
GET / HTTP/1.1
Accept: */*
Accept-Encoding: gzip, deflate, compress
Host: www.xyu.io
User-Agent: HTTPie/0.6.0

HTTP/1.1 200 OK
CF-Cache-Status: EXPIRED
CF-RAY: XXXXX
Cache-Control: public, max-age=1800
Connection: keep-alive
Content-Encoding: gzip
Content-Type: text/html; charset=UTF-8
Date: Sun, 21 Jul 2013 15:53:18 GMT
Expires: Sun, 21 Jul 2013 16:23:18 GMT
Last-Modified: Sun, 21 Jul 2013 15:52:47 GMT
Link: <http://wp.me/3BqUq>; rel=shortlink
Server: cloudflare-nginx
Set-Cookie: __cfduid=XXXXX; expires=Mon, 23-Dec-2019 23:50:00 GMT; path=/; domain=.xyu.io
Transfer-Encoding: chunked
Vary: Accept-Encoding
X-Batcache: Cached, generated in 807ms, expires in 269s (300s TTL), served in 46ms
X-Pingback: http://www.xyu.io/xmlrpc.php
X-Powered-By: PHP/5.3.10
Best of all is appears CloudFlare has a special exemption in their “browser cache expire TTL” minimum setting for requests with an explicit no cache header. Those continue to not be cached by CloudFlare, (notice the lack of a CF-Cache-Status header below,) in addition, CloudFlare continues to send the max-age=0 header the client as well to prevent browser caching.
GET /no-cache-test.php HTTP/1.1
Accept: */*
Accept-Encoding: gzip, deflate, compress
Host: www.xyu.io
User-Agent: HTTPie/0.6.0

HTTP/1.1 200 OK
CF-RAY: XXXXX
Cache-Control: max-age=0
Connection: keep-alive
Content-Encoding: gzip
Content-Type: text/html
Date: Sun, 21 Jul 2013 15:54:20 GMT
Server: cloudflare-nginx
Set-Cookie: __cfduid=XXXXX; expires=Mon, 23-Dec-2019 23:50:00 GMT; path=/; domain=.xyu.io
Transfer-Encoding: chunked
Vary: Accept-Encoding
X-Powered-By: PHP/5.3.10
Step 3: … Profit?
Now that we are serving most of our requests from CloudFlare the actual hits per day that we can sustain is likely higher than the 20 Million number. All of our requests from the blitz.io load test originated from their Virginia data center. Given the anycast nature of CloudFlare’s network this means all those requests probably ended up at CloudFlare’s Washington, DC data center. Currently CloudFlare has 23 such data centers around the world and together they already handle more traffic than Amazon, Wikipedia, Twitter, Instagram, and Apple combined.
Looking at the flat nature of the response time curve below it becomes obvious that our hits per day score from blitz.io was actually limited by the 250 concurrent user and network latency between CloudFlare’s servers and blitz.io’s servers. In reality our infrastructure can serve many more requests.
So now the final problem is to actually get 20+ million organic hits per day to our site and for that I have no tips but if you know of a way be sure to let me know.